What You Will Learn
Using an example file, we’ll explain the meaning of each byte and how the MIDI file is constructed. After understanding the basics, we should be able to manually build a MIDI file with a simple HEX Editor or by writing a program.
However, not all topics and usages will be covered. Only the minimum information we need to complete this example project will be introduced.
This is the “music” that we are going to create:

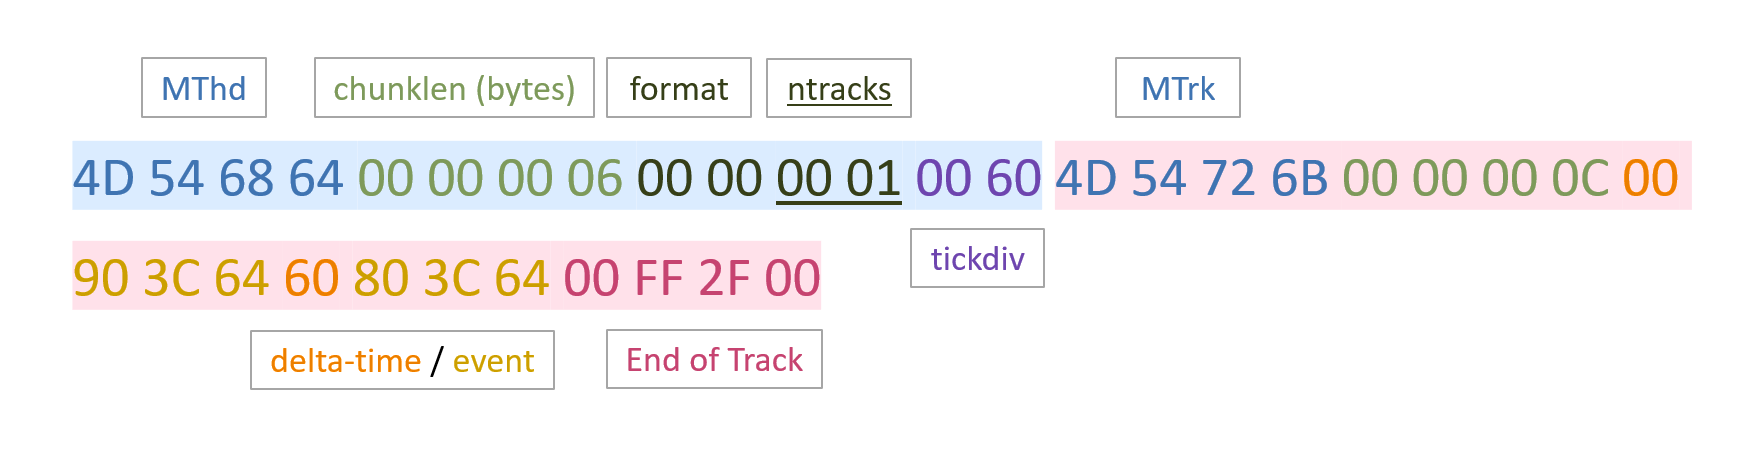
The result is a .mid file with its content written in hexadecimal notation:
4D 54 68 64 00 00 00 06 00 00 00 01 00 60 4D 54 72 6B 00 00 00 0C 00 90 3C 64 60 80 3C 64 00 FF 2F 00
Let’s break it down and explain each section in detail.
Header Chunk (MThd)
The first 14 bytes of the sample file is the header chunk.
| Data(hex) | Meaning | |
|---|---|---|
| 1. | 4D 54 68 64 | identifier, ascii chars ‘MThd’ |
| 2. | 00 00 00 06 | chunklen, 6 bytes follow |
| 3. | 00 00 | format = 0 |
| 4. | 00 01 | ntracks = 1 |
| 5. | 00 60 | tickdiv = 96 ppqn |
- The first 4 bytes is the header chunk identifier ‘
MThd’. chunklenrepresents the number of data bytes in this chunk.formattype set to0for single MTrk chunk.ntracksmust be1for format 0.tickdivis the number of divisions for one quarter note.96is commonly used. (ppqn = pulses per quarter note)
Track Chunk (MTrk)
Right after the header chunk is the track chunk, which is 20 bytes long in our example.
| Data(hex) | Meaning |
|---|---|
| 4D 54 72 6B | identifier, ascii chars ‘MTrk’ |
| 00 00 00 0C | chunklen, 12 bytes of data follow |
| 00 90 3C 64 | Note On event |
| 60 80 3C 64 | Note Off event |
| 00 FF 2F 00 | End of Track event |
- The first eight bytes are
identifierandchunklenrespectively, same as those in a header track. - The following 12 bytes are
delta-time/eventpairs, which are introduced below. - If more events are added, the number of
chunklenshould be updated accordingly.
Delta-time/Event Pair
Delta time/event pairs are used to represent MIDI events and the distance relative to its former event. The basic structure of the data pair is illustrated below:
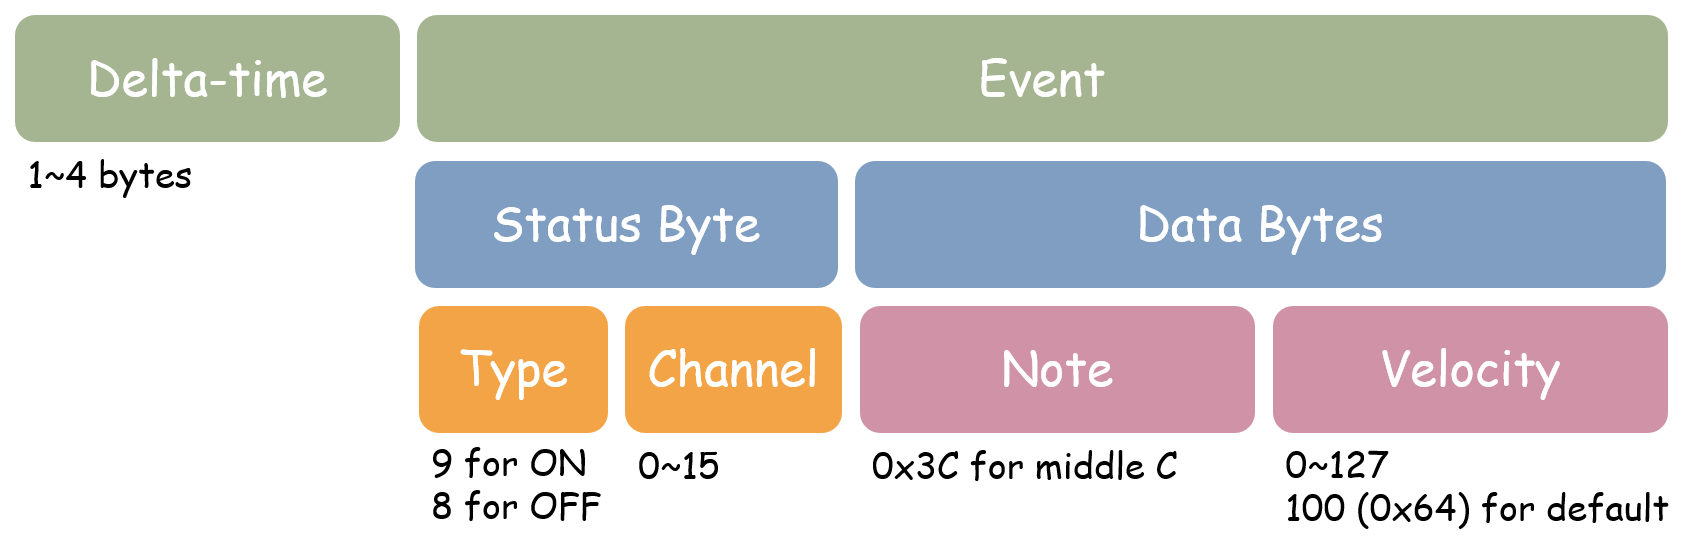
Delta-times
Delta-time is the number of tickdiv after the previous event. It’s specified using variable-length representation with 1 to 4 bytes. The most significant bit of each byte is occupied for determining whether that byte is the last one in the data sequence.
Some of the eligible numbers before and after carrying are shown in the table below:
| Decimal | Binary | Hexadecimal |
|---|---|---|
| 0 | 00000000 | 00 |
| 127 | 01111111 | 7F |
| 128 | 10000001 00000000 | 81 00 |
| 16383 | 11111111 01111111 | FF 7F |
| 16384 | 10000001 10000000 00000000 | 81 80 00 |
Note that only the last byte has a prefix of 0, and the other bytes before it are all 1xxxxxxx. Thus, a delta-time of 81 00 represents 128 in decimal instead of 33024.
More examples, as well as detailed explanations, can be found here.
MIDI Events
Only three types of events are used in this sample. Other events including pitch bend, tempo, and instrument name are listed on the website here.
1. Note On Event
9n + note + velocity (3 bytes)
In our example: 90 3C 64
9: for Note On0: MIDI channel number 03C: starting note is 3C (see note number chart below)64: press velocity is 100 (0~127)
2. Note Off Event
8n + note + velocity (3 bytes)
In our example: 80 3C 64
8: for Note Off0: MIDI channel number 03C: ending note key is 3C (range: 00~7F)64: release velocity is 100 (0~127)
3. End of Track Event
In our example: FF 2F 00
Therefore, the data 00 90 3C 64 means “At delta-time 0 from the beginning of MIDI channel 0, press down middle C with velocity 100.” Similarly, 60 80 3C 64 means “At delta-time 96 from the previous event at MIDI channel 0, release middle C with velocity 100.”
MIDI Note Numbers
This chart displays all note numbers corresponding to each key and octave. The middle C is 3C in hex, which is especially easy to remember.
| Note \ Octave | -2 | -1 | 0 | 1 | 2 | 3 | 4 | 5 | 6 | 7 | 8 |
|---|---|---|---|---|---|---|---|---|---|---|---|
| C | 00 | 0C | 18 | 24 | 30 | 3C |
48 | 54 | 60 | 6C | 78 |
| C# / Db | 01 | 0D | 19 | 25 | 31 | 3D | 49 | 55 | 61 | 6D | 79 |
| D | 02 | 0E | 1A | 26 | 32 | 3E | 4A | 56 | 62 | 6E | 7A |
| D# / Eb | 03 | 0F | 1B | 27 | 33 | 3F | 4B | 57 | 63 | 6F | 7B |
| E | 04 | 10 | 1C | 28 | 34 | 40 | 4C | 58 | 64 | 70 | 7C |
| F | 05 | 11 | 1D | 29 | 35 | 41 | 4D | 59 | 65 | 71 | 7D |
| F# / Gb | 06 | 12 | 1E | 2A | 36 | 42 | 4E | 5A | 66 | 72 | 7E |
| G | 07 | 13 | 1F | 2B | 37 | 43 | 4F | 5B | 67 | 73 | 7F |
| G# / Ab | 08 | 14 | 20 | 2C | 38 | 44 | 50 | 5C | 68 | 74 | - |
| A | 09 | 15 | 21 | 2D | 39 | 45 | 51 | 5D | 69 | 75 | - |
| A# / Bb | 0A | 16 | 22 | 2E | 3A | 46 | 52 | 5E | 6A | 76 | - |
| B | 0B | 17 | 23 | 2F | 3B | 47 | 53 | 5F | 6B | 77 | - |
The same chart in decimal notation can be found here.
Quick Review
Interpreting the MIDI File
Files with the extension .mid can be read by various software and be viewed or edited in different notations. The following are two examples:
Staff
Our example project is converted into a quarter note on a standard five-line staff using MuseScore.
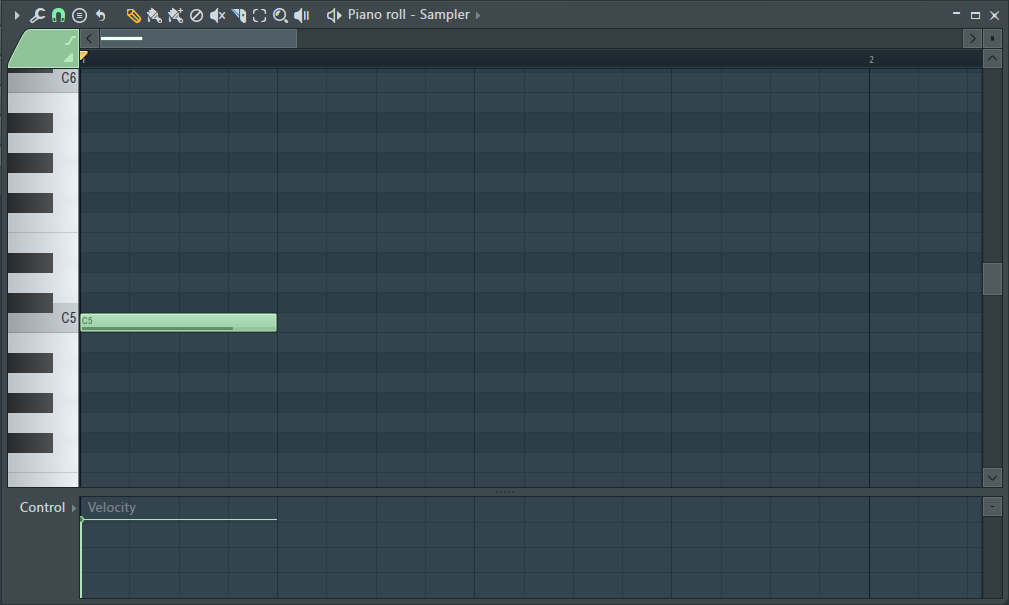
Piano Roll
Notes can also be shown on a MIDI piano roll editor in FL Studio.
Reference
This tutorial is based on the information of MIDI Flies Specification from Somascape.
]]>This is a guest post written by @J1soon.